FAQs
This page answers the questions that budding dulcimer/autoharp musicians and inquiring minds ask most at concerts, workshops, festivals and via email. Click on your instrument choice below to go to a list of questions related to it.
Got a question that’s not addressed on this page? Send it to me by clicking here. And come back and visit this page from time to time to see what’s been added.
Hammered Dulcimer FAQs Autoharp FAQs
Miscellaneous FAQs
Hammered Dulcimer FAQs
Is the dulcimer easy to play for a person who has experience playing other instruments?
I’m looking to buy my first dulcimer. What are some things to keep in mind? (If you already play and are thinking about getting a larger dulcimer, click here.)
What is a “chromatic” dulcimer?
Why is there only one “right” way to play? That doesn’t seem fitting for a folk instrument.
Autoharp FAQs
What’s the difference between a chromatic autoharp and a diatonic autoharp?
What’s an “ultratonic” autoharp?
Is it better to play the autoharp standing up or sitting down?
What chord button arrangement would you recommend for a diatonic autoharp?
How do I keep my fingerpicks from falling off?
Miscellaneous FAQs
I read music well. Do I need to take a beginner class?
When will you be performing in my area?
Hammered Dulcimer FAQs
Is the dulcimer easy to play?
Let’s put it this way: Every instrument is easy to play. But every instrument is difficult to play musically. And oddly enough, musical music comes not from the instrument nearly as much as it comes from the player. It takes more than knowing where the notes are on the dulcimer (I call this “geography”); in fact, I’ve done my best to explain geography so well in Chapter 2 of Striking Out and Winning! that I no longer expend the 20 minutes it takes to teach geography face-to-face, giving it instead as “homework” following a student’s first lesson. However, the greatest challenge is teaching the player how to dance with the music by making the playing feel easy in the body! Easy playing takes some know-how and thought, as well as some ear development (a how-to can also be found in Striking Out and Winning!), but once the basics are in place (this takes about a couple of weeks for those who play daily), the player eventually goes on “automatic pilot” and can move on to the business of making music that communicates to listeners’ souls, which is the point.
Back to Hammered Dulcimer FAQs
Is the dulcimer easy to play for a person who has experience playing other instruments?
Maybe. The dulcimer is a more perceptual and physical instrument than most, so in my teaching I emphasize that my students learn to play themselves in order to play the dulcimer (as mentioned in the previous question.
Of the many students I’ve taught since 1980, I’ve had some with music backgrounds who got along well, and others who struggled. (The strugglers are mostly pianists who find it tricky to see the scale backwards to the keyboard, and who have trouble realizing that sometimes the hammers have to head lower on the dulcimer to strike a higher tone.) Conversely, I have some first-timers to music who do quite well, while others of that group struggle, too. So there are no guarantees, although I would say that those who have a strong determination to play will probably more than succeed. Also, among my best students are those who contra dance. Because they actively dance to the reels and jigs I start them with in Striking Out and Winning!, they already know what the music is supposed to sound and feel like.
Another seeming determining factor (although I’d need a larger cross-section of students to know for sure) is vocation. Math-oriented people seem to comprehend the dulcimer’s visual “geography” more easily than, say, people who are verbally oriented. But that isn’t everything. People who have approached life in a relaxed way seem to do well also, because their musculature has tended to remain loose. (Example: If you’re driving in traffic and your shoulders are in the air, let go of them. You’ll actually feel better!) Age doesn’t necessarily have an effect when life approach is considered: My oldest student (now deceased; she was my education professor in college!) moved quite easily playing the dulcimer, which I attribute to her years of playing violin, another physical instrument.
New players do well to start with reels, jigs and hornpipes as presented in Striking Out and Winning!, because the note values are short and therefore easy to play with a rhythm-based stroke order that allows the player to “dance” along while playing. I also recommend attending contra or square dances. It’s a great way to meet people while inviting the music into your soul.
Back to Hammered Dulcimer FAQs
I’m looking to buy my first dulcimer. What are some things to keep in mind?
First of all: Congratulations! There are lots of nice dulcimers out there, with lots of different features, too. Choosing just one can seem like an endless maze of sounds, tuning arrangements and woods, but if you take your time (and a few deep breaths), you will find a dulcimer that pleases you. Now consider these thoughts before you go shopping:
- Look at this purchase as the only dulcimer you’ll ever own, even if it won’t be. (I still have my first dulcimer and won’t part with it. In fact, it’s featured on my CD, Thus Sings My Soul.) Your search will take more time, but your chances of finding something you’ll like and keep, at least for a while, will be greater.
- What are your goals for playing? These may be difficult to visualize right now, but here are some questions by which to focus your thinking:
- Do you want to play in the privacy of your own home?
- Do you want to play with others? (At the local folk-music club, at festivals, other places or all of the above?)
- Is performing a possibility? (Church, school, nursing home, stage, choir accompaniment, etc.)
Your answers will have some bearing on what you eventually buy.
With these points in mind, here is what I recommend when looking for a first dulcimer:
- Size/range: I recommend a 15-14 dulcimer. This instrument’s three-octave range plays the “regular keys” of A, D, G, C and F major (plus E with some searching), and is fully chromatic in the middle of its range. This size has served me well for just about anything. You can buy the smaller 12-11 size (D, G, C and F, plus A with some searching), but because there’s no such thing as a beginner’s dulcimer (the scale layouts are the same regardless of how many courses the dulcimer has), go for the larger size if you can afford it. Also go for the 15-14 if you have a substantial musical background; you’ll want as many notes as you can get your hands on.
The above tunings are set on two long bridges running the length of the box, called the treble and bass bridges. Any extra short bridges indicate a chromatic dulcimer (see the next question).
The largest dulcimer I know of is a 21-20, but who knows? To make all the courses fit, however, the instrument doesn’t necessarily become larger; instead, the spacing between courses becomes closer (as much as 3/4″ from the top string of one treble course to the top string of a neighboring treble course). Such close spacing creates accuracy problems for me (my dulcimers have 1-1 1/4″ string spacing); however, closer spacing (I’ve seen 7/8″) may cause movement problems leading to discomfort and/or injury, which no one needs. - Number of strings per course: Many dulcimers today are made with two strings per course. Two of my own dulcimers have three strings per treble course; such arrangements are still made today, but by only a few builders in the United States. With three strings per course (and often two per bass course), greater volume is a given, it takes a lighter touch to strike the strings, and the sound seems to float more nicely than two strings per course. (Note: I have met some “two-stringers” that have a real nice floating sound, too, so listen carefully! However, I find I have to strike the strings harder to get the instrument to sing.) A very few dulcimers have four treble strings per course, but, having owned one such dulcimer myself once upon a time, I find the fourth string makes this dulcimer more difficult to tune sweetly and cleanly, and it takes longer to tune.
- String spacing: If you have a way to judge without a ruler, measure the distance from the top string of any treble course to the top string of the next treble course above or below. A string spacing of 1 to 1 1/4 inches works well. More than this, and you’ll feel like you’re leaping around to reach the strings (you will be). Less than this, and you’ll necessarily limit the size of your moves while playing, which may cause unforeseen problems down the road.
- Tone: This, to me, should be every wanna dulcimer player’s first consideration. If you like the way the dulcimer sounds, you’ll be inspired to play it. There are vast differences in sound among dulcimers today, so it’s important to take your time and check around. That “love-at-first-sight” encounter may not please your ear as much as dulcimers you meet later on. The best place to see and hear lots of different dulcimers is at any of the dulcimer festivals around the country. (Note that there are “regional preferences” out there, due to a builder living in the area, or a local music shop that sells one or two particular makes, so you won’t necessarily see a lot of different makes in one place.)
- Sustain: Dulcimers vary in the length of ongoing sound trailing after a course is struck. A long sustain can build jigs and reels into “three-dimensional” works (see my article about sustain as an asset), while dulcimers with a short sustain may make more amicable jamming instruments with fiddles, mandolins and such.
- Volume: There are differences in volume as well, so if the players you meet will let you strike around a little on their dulcimers, you’ll soon discover what your own preference is. Strike both treble and bass strings with the same weight to check for evenness in volume. Also, the dulcimer’s weight has a bearing on volume overall: It seems to me that, in general, the heavier the dulcimer is, the more volume it has. (Face it: They kinda have to be built like opera singers to make any reasonable “noise.”) This brings me to:
- Weight: If you want to hit the road to jam at music festivals, a 25-pound dulcimer might be impractical to carry around (music festivals cover a lot of area), unless you or someone related to you is strong in stature. However, the compact (meaning very small) dulcimers may cause you to feel cramped when you play, due to the closer spacing of everything, as stated in string spacing above. On the other hand, if you plan to perform, you might want a heavier instrument capable of more volume. (When I perform, I don’t count on a sound system being available. My heavier instruments allow for playing with organs, singing audiences and orchestras just as much as jamming with bluegrassers.)
- Structural integrity: Is the dulcimer solidly constructed? Is it pleasing to look at? Are the strings wound on the pins so that the ends aren’t exposed (children’s little fingers love to explore)?
- Price: Whatever you can afford! I list this last, based on all the above factors because, frankly, forking over your money is the easy part. As you look around, you’ll soon gain a feel for typical price ranges of comparable instruments.
- Buying on the spot vs. custom orders: If you’ve looked enough and found something that pleases your ear, eye, and wallet now, look no further. Fork over your cash and get started! Placing an order with a builder who will build your dulcimer from scratch is fine, too, but consider that this usually involves a wait that I’ve generally experienced to be longer than the guesstimate given at order time. Can you wait that long–or longer? Only you can decide. I consider a year’s wait too long for a first instrument, but if you’re convinced it’ll be wonderful and you have lots of other tasks on your plate before it comes, go for it. (Oh, and when you do, I just happen to know of a good instruction book….)
Click here to see some of the dulcimer builders I recommend. There are at least a few players where you live (and certainly more via the Internet) to help you decide. Best wishes on your search!
Back to Hammered Dulcimer FAQs
What’s a “chromatic” dulcimer?
Most chromatic dulcimers add courses to the normal fifth-interval tuning (shown on page ix of Striking Out and Winning!) to complete the chromatic scale for much of the dulcimer’s range. Extra courses often mean extra bridges, usually placed above and/or below a normal 15-14 set-up, or sometimes on the left side of the dulcimer (an example of the latter is shown on the back cover of Striking Out and Winning!). It’s important to note that what a builder calls a 16-15 chromatic dulcimer may actually have a normal 14-13 fifth-interval tuning, plus two more each of treble and bass courses holding chromatic tones. It’s also important to find out if any of the chromatic tones replace what’s usually part of, say, a 15-14 tuning.
What are the advantages of a chromatic dulcimer? 1) It certainly has more notes! 2) I’ve found my chromatic 15-15, Meshach, to be useful for playing concertos with orchestras because of its chromaticism. (I don’t, however, find the extra sharped or flatted tones enormously useful when jamming to jigs and reels. If your highest desire is to jam to fiddle tunes, a chromatic tones may not be worth the expense.)
Which brings me to the disadvantages of a chromatic dulcimer:
- One of my dulcimer customers noted that a chromatic dulcimer seems less resonant than a diatonic (the added chromatic strings don’t vibrate sympathetically as much because there are fewer of them).
- I’ve personally gotten around the lack of extra chromatic tones on my dulcimers by note substitution. I have yet to hear a listener comment that I played a “wrong” note in a performance, so it must be okay!
- You don’t have to worry about negotiating large hammer leaps to catch chromatic tones sitting on the inconvenient periphery of the strings.
Some luthiers have created other chromatic set-ups, such as a second-interval relationship across the treble bridge instead of the usual fifth-interval), after which consecutive courses in the three main vertical regions are tuned in entirely in half-steps (C, C#, D, D#, E, etc.). I have only seen such a “beast” and haven’t played it to understand its advantages, but I would suggest that this type of dulcimer be a player’s second dulcimer, because its potential as a solo instrument can be vast but will take a little doing to learn.
Certainly players and builders of all of the above-mentioned instruments can help you decide if a chromatic dulcimer is right for you, as well as searching them out yourself and playing them, once you decide your proposed repertoire requires the extra notes. It is indeed an individual decision for every dulcimer player.
Back to Hammered Dulcimer FAQs
I’ve been playing the dulcimer for some time, and am thinking about upgrading to an “extended-range” dulcimer. What should I keep in mind as I look around?
Extended-range (ER) dulcimers are initially attractive because they have more courses than a “standard” 15-14 dulcimer, which can expand upward to include more pitches in the flatted keys of F major and beyond, as well as house “common” low tones an octave below the very lowest tones with longer and thicker (wound) strings. Still, they pose their challenges, especially to the player who is short in stature. What I would consider is:
- Size/Set-up: ER dulcimers are often longer in vertical length than 15-14 dulcimers, meaning the distance from where the player stands out to the far or narrow end. This distance may force the dulcimer to be tilted steeper and positioned lower than what is biomechanically healthy for the player. Therefore if you’re tall and/or have long arms, you may be able to play on a larger sized instrument without incident. If you’re short, I’d recommend getting some firsthand experience on the brand of ER dulcimer you’re interested in, being sure to adjust its height and angle to suit you. If an ER dulcimer doesn’t live nearby, you’ll surely catch up with one at a festival.
- Access to all the strings: Springing from the previous point, when you have to reach out a lot more to strike the highest strings on a vertically long ER dulcimer, the arms’ weight becomes more readily felt and in time can be tiring and even cause neck, shoulder, back, etc. pain.
- course spacing: Instead of making the vertical length longer than the ca. 15-14 dulcimer, some builders of ER dulcimers incorporate less space between courses by which to fit in more strings. While on the surface this looks like a way for ER dulcimers to accommodate short players, there is some concern among occupational therapists that the smaller playing moves resulting from close course spacing (7/8″ and less, measured from the top string of neighboring treble courses) produce excess muscular tension that can lead to performance-related injury.
- Weight: Do you prefer a heavier dulcimer or a lighter wallet?!
- Your own height: Related to the above point: Are you tall enough to carry an ER dulcimer at your side in its case?! And remember that carrying any dulcimer at your side also means going up and down stairs with it, usually translating into flexing the arm more to lift the dulcimer to clear steps. If you’re short, count on having to flex the arm at the elbow quite a bit more when negotiating stairs due to the ER dulcimer’s vertical length, which could be more than uncomfortable.
- Vehicle transport: Will an ER dulcimer fit in your car? Someone else’s? If it does fit, will you be able to get it in and out easily? (Get measurements, and be sure to include an extra couple inches all the way around for the case it will inevitably reside in.)
- How much are you going to strike all those “extra” strings? How handy will Bb major, E major, etc. be in an old-time jam session, if the tunes played there are your passion? How often will you strike those super-low strings? How often do you intend to play with orchestras? Considering these questions, is a ca. 15-14 already enough to suit your needs?
- Composition: Wearing my composer’s hat and standing at the other side of the ER dulcimer, you need to know I shy away from composing dulcimer parts to my choral works that go outside the 15-14 range pitch range, because (and this is my take only):
1) The pitches outside the 15-14 range are inconsistent from make to make. There are no guarantees that a player of an ER dulcimer would be able to faithfully render what I’ve put on paper were my dulcimer parts to go outside this range.
2) A lot of players still play ca. 15-14 dulcimers. Because I want my choral works performed, I compose the dulcimer parts so that they are 100% accessible to most dulcimers: no retuning, and no wishing that I or anyone else has a larger instrument. On occasion I’ve been faced with striking high notes set by other composers an octave lower because they are out of range, and for one choral work I rewrote the dulcimer part because just about the entire range was too low for my instrument.
Back to Hammered Dulcimer FAQs
My dulcimer sounds tinny, and this is my 14th dulcimer. Do you know of any dulcimers that don’t sound tinny?
I’ve found more frequently that the reasons behind a tinny sound lay within the player, rather than the dulcimer. That’s good news. Fixing how you play is remarkably inexpensive, requiring only time and keen observation on your part. So, put those catalogs and your wallet away and keep reading.
Back in the 1980s I researched the subject of tone, one of many subjects I documented thoroughly in four thick, spiral-bound notebooks to learn how to teach as well as play the dulcimer. As the result of that research, much of it taught in Striking Out and Winning!, here are some things you can explore to avoid a tinny sound:
- Strike action: Take a look in a mirror while you play. (Mobile devices work, too, but I like a mirror because it’s fast to set up.) If the strike action originates at the wrists, the sound will not only be tinny, but loud and strident. In fact, one of my students pointed out how he could hear the wood of the hammer on the strings, something which disappeared when he transferred his playing action back to his elbows.
- Hammer hold: Holding the hammers on the ends of your index fingers forces the thumbs to apply more pressure to hold on to the hammer. As a result, they have to stiffen up, which in turn contributes to a tinny sound. My research demonstrates that the thumbs are the tone makers, so when they’re relaxed, the rest of the body relaxed, too, making the sound soft and full, even when playing with hammers having wooden striking surfaces. (Don’t believe me? Click here!)
- Continuous motion between strikes: Again, check your playing in a mirror. Do your hands stop between strikes? (This is sometimes due to haphazard stroke order that’s built around the melody or the dulcimer’s tuning rather than on the tune’s rhythm.) If they do stop, the sound is often tinny, and may be more harsh and/or loud than you’d like.
- Dulcimer tilt: While steep dulcimer tilts have been popular on the notion that they make the strings easier to see (barely true, click here), the dulcimer’s sound is compromised by the hammers’ tips being forced upward, which shifts the hammers’ weight toward the handles. With the tips of the hammers opposing gravity, there’s less force falling on the strings, magnifying a tinny sound. For more information, click here, and see Chapters 2 and 4 of Striking Out and Winning! Also, I’ll be happy to come to your area to show all of this to you and your friends.
Back to Hammered Dulcimer FAQs
I think I’m doing everything you say in Striking Out and Winning!, but my dulcimer still sounds “dead.” Is there anything else I can do, or is it time to look for another dulcimer?
I’d like to see how you wield the act of playing, because that will tell me a lot about what we’re both hearing. No matter where you live, if you have a webcam and Skype, we can meet together and find out a lot!
Barring that, there are two things I can think of looking at:
- Dulcimer tilt: see the last bulleted point of the previous question (well, for that matter you might want to read the entire answer to the previous question, just in case).
- That dead sound could be coming from the dulcimer stand! If it’s what I call a “three-point” stand, the third point, under the highest strings, is practically dead center under a brace supporting the treble bridge inside the dulcimer. (This is also true of stands where the dulcimer sits fully on its top sides.) This point serves as a vice grip, limiting the vibrations in the bottom of the instrument. But you can’t tell that this is happening until you can hear the difference.
What will enliven the sound is switching to a “four-point” stand, which moves the stands contact points away from the treble bridge. You can easily convert a three-point stand to four with the help of a “prosthesis.” Mine is a scrap piece of maple, 16 1/2″L x 3/4″W x 1/2″D. (Notes: 1. Use a hard wood; a soft wood may not support the dulcimer’s weight well. 2. The length can be shorter or longer, depending on the length of the dulcimer at the high end.) To this piece of wood on the width side I added two scraps of autoharp felt towards each end, placed about a foot apart. Finally I placed a pencil mark on the center of the wood piece.
To set the prosthesis under the dulcimer: Place the dulcimer on the stand. Stand in front of the dulcimer’s narrow end. Lift the dulcimer a little, center the pencil mark on the prosthesis with the center of the stand’s third point, then set the dulcimer down on the prosthesis gently.
The proof is in the playing, so play an excerpt from a tune you know well, both with and without the prosthesis in place. It also helps to have a listener nearby, as the sound “blooms” well beyond where you and the dulcimer are. I’ve consistently found, on my dulcimer as well as others (by various makes, too), that the sound literally flows out of the dulcimer when the stand changes from three to four points.
Now, if you’re still not satisfied, maybe it’s time to go shopping!
Back to Hammered Dulcimer FAQs
I want to learn to play the hammered dulcimer, but my specific interest is hymns (jazz/whatever) other than fiddle tunes. What’s the best way to get started, given my interest?
I recommend starting with fiddle tunes, anyway. Here’s why: All the little notes in fiddle tunes (mostly eighth and sixteenth notes) make the stroke order easy to discern, an essential part of mastering both the resonance and movement that makes dulcimer playing musical. The quarter notes, half notes and larger found in so many hymns “mush up” the dulcimer player’s lead, and ultimately the musicality of each phrase. I ponder specifically a four-note scale of quarter notes in 3/4 time, going up, then down. There are six different stroke-order combinations for this scale, and they all articulate differently. That’s too much for a beginning dulcimer student to address, regardless of previous music experience. I therefore suggest regarding fiddle tunes as highly useful exercises that will help you progress to “bigger and better” things. One of my private students did just this–with not a lot of fiddle tunes from Striking Out and Winning!, but enough to catch the concepts–and the world of playing praise music musically has opened up to her in ways she could not have imagined without having gone the fiddle-tune route first. She understands now that there is no getting around the technical advantages that come with the basic skills that reels and jigs provide.
Back to Hammered Dulcimer FAQs
I’ve watched you play up close. Why do you hammer up and down the strings a lot instead of hammering across the dulcimer?
When I play up and down the strings, it is usually the easiest way to see the path through that particular portion of a tune. Remember, the goal is to play musically, not to see how horizontally you can play. While the dulcimer’s unisons give us choices as to when to shift positions, we don’t have to make a point of playing all over the place, especially when it’s inconvenient. For example, imagine a tune that eventually runs up a six-note scale (below). I’ll assume that first note, D, will be struck in first position (to the right of the treble bridge):
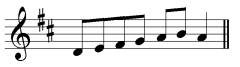
Playing the above with a right-hand lead, you’d begin with the right hand. When you reach the highest note in the passage, B, at last you can shift to second position to strike it. But why would you want to go over there when B is the next course up in first position? Left-handed players can play both A & B in second position, but even they would have to pull the pattern out of shape to reach across and down the treble strings. Further, the visual leap your eyes have to negotiate to catch the note(s) means that you increase your chances of missing (especially if you eyeball the wrong course!). By playing the entire passage in first position, A & B fall in line with all the other notes. It is my choice to play this passage vertically.
Is this to say that I’m against horizontal playing? Not at all. When horizontal playing is convenient, it’s wonderful and feels great! The tunes in Striking Out and Winning! demonstrate that I play horizontally, too. (You might also check out the “logic of playing” entries in that book’s index.) When horizontal playing works, it’s wonderful, but when it doesn’t, don’t force it, as it can throw off your hammering.
A great place to play horizontally is wherever an arpeggio appears a tune, as in m. 4 of the B section in Petronella, a tune that’s in Striking Out and Winning!.
In other tunes, how horizontally an arpeggio can be played also depends on the location of notes immediately before and after it. Step-wise passages, like the example above, give pause for thought: Is that position shift really necessary? Maybe it is, but maybe it’ll be easier on your eyes, and on the flow of your hands over the strings, to stay on the vertical track. So the point is (especially when you are playing at lightning speed) to avoid negotiating unnecessary, large patterns that encumber your vision and send your hands in opposing directions that don’t feel natural, unless that’s the only choice you have. There’s no sense in making your playing needlessly frantic and insecure.
I’ve recently resurrected a book manuscript explaining how to determine a tune’s “choreography,” or a combination of pattern as determined by a rhythm-based stroke order, to help players better transform the visual aspects of playing into communicative music.
Back to Hammered Dulcimer FAQs
Most of my opportunities to play with other musicians have been at contra dances in my area, where the fiddlers sometimes play a tune that I play in a different key (more often than not they ask for A major). While I can handle transpose some tunes (i.e., Golden Slippers from D to G), I have difficulty transposing tunes that are played on both sides of the treble bridge on the spot at a contra dance. I tend to just move up and down, so that the pattern doesn’t have to change much, but I wonder: Are there times that changing the pattern (changing sides on the treble bridge) is a better idea?
Nothing new here; everyone experiences this! Transposing to A major is a force to be reckoned with at contra dances, but if you check written sources, you may just find that the tunes in question appear in A major, anyway, which we dulcimer players then change to other “more agreeable” keys.
A few things about your question remain unclear. First, you don’t say what size dulcimer you’re playing. It sounds like it could be a 12-11 as easily as a 15-14, so I’ll address both. Next, I’ll assume you read music because of the contra-dance playing. Finally, if you read music, I wonder if you look at the music notation while playing. I’ll attempt to answer your question while keeping these possibilities in mind. (You’ll also find a brief discussion in the Appendix of Striking Out and Winning!)
Transposing on the dulcimer is mostly easy because, as you said above, it’s usually a matter of moving all of a tune’s patterns up or down (or over) to a new set of bridge marks in the desired key. What’s important here are the patterns. It’s been my experience as a teacher that HD players who look at music while playing lack have yet to tap in to pattern recognition in a big way, plus the ear is often turned off. Playing, then, becomes a visual exercise instead of an aural excitement. So, if you’re looking at music when you play at contra dances, I suggest you train yourself play by memory so you can shift your focus to the strings (Striking Out and Winning! offers ideas on how to do this; see chapter 4, page 51). Once you zoom in on the patterns the hammers find, you can easily move them to other bridge marks and keys.
Where transposition gets sticky, as you know, is when you run out of courses at either the top or the bottom of the dulcimer’s range, as is the case with A major. You can find this scale over all three of the dulcimer’s vertical positions (as I call them) on a 12-11 (see Striking Out and Winning! Appendix for patterns); on a 15-14, the same is possible, plus playing at the bottom of the treble bridge in 3 two-position scale patterns. In both cases, you’ll likely play the tune an octave lower than the fiddles, which I have to say sounds a little “grumbly,” even if it does work. But to play up where the fiddles are, tunes in A largely sit in second position (left of treble bridge), but with a G natural instead of G# in the tuning (making A’s upper octave a Mixolydian mode instead of a major scale–this is also true for the 12-11). If you don’t already have the higher G# on your instrument, or you do but it’s an awkward reach to get to, here are your options:
- Exchange the G# for another note that works for the tune (that’s a trick for Mason’s Apron, though).
- Make a small “capo” to stick under the G natural course to raise it to G#, and perhaps another capo to raise high C to C#.
- Forget 1 and 2 and harmonize by ear!
- If you have a 12-11, look into getting a 15-14 or larger.
It sounds like you’ve been playing for dances for a while, so you probably have a good feel for which tunes the band plays in A in order to work them out at home. They will take time to smooth out in A major (yes, some patterns will wind up looking different–just accept that), so it seems there’s no getting around just plain practicing them. For tunes you know in other keys which you now must play in A with the band, if you can, put the “old keys” of those tunes aside for a while to give your hands a chance to forget how they played in those keys. You might also ask the band members what other tunes they play in A so you can get a jump-start on them for upcoming dances.
I hope this answer is at least close to what you’re looking for. It’s wonderful that you’re playing for dances; the dance band is a great resource by which to learn new tunes.
Back to Hammered Dulcimer FAQs
I don’t hold my hammers the same. Periodically I check the picture in Striking Out and Winning [on page 15 of the 2nd edition], but as I play, I slip back into my old habits. Is this altogether bad?
This question is a little tricky to answer because you don’t say what’s actually going on with your hands. Does one hand hold true to what’s in Striking Out and Winning! and the other slip, or do they both wind up somewhere else? Which hand holds the shifting hammer? Where does the hammer land on the index finger, what’s the position of the thumb to the hammer, and are fingers together or apart? And what do your hammer handles look like?
You are already aware that both hands mirror each other, and that’s good. As for the “altogether bad” part, I would hoist a red flag if one hammer winds up sitting on the end of the index finger or even in the first joint, because this could invite problems down the road. Even if your hammer stays put on the middle segment, but your fingers separate, your thumb loses the fingers’ support and has to press down on the handle. That’s a potential problem brewing, too. The idea of the hammer hold is to let the thumb lay on the handle with the help of only gravity, which produces the best audible tone. And when the thumb is free and easy, the rest of the body is, too. (Talk about a rudder directing the ship!)
The wood the hammers are made of may contribute to what you’re experiencing as well. I’ve found that extremely hard woods, like rosewood and ebony, don’t always rebound from the strings the same way they go down on them. (I had a rosewood pair made in my preferred design, and they behave just as unreliably as any other rosewood hammer.) An unreliable rebound may also shift where the hammers sit on the index fingers.
Another thing to check is the width of the hammer handle in relationship to the width of your thumb. I recently tried out a pair of hammers whose handles were half the width of my thumbs, and the right hammer kept trying to rotate sideways while I played (the top right edge wanted to be under the middle of my thumb; why the left hammer didn’t want to do this also is a mystery to me, but it could be due to a difference in thumb weight between hands). My usual hammers, which stay put, are 2/3 the width of my thumb. So perhaps taking measurements and changing your hammers to those with handles creating this relationship will be worthwhile.
Although I need more information to really answer this question, here is an idea that might help your hands attain symmetry: Try gently forming your hand’s shape with large rubber bands or lightly attach Scotch tape. If you have several small rubber bands, loop several together into a small “Chinese jump rope” to make a longer, elastic piece. (A fat, stretchy yarn might work well, too.) Whatever you use, don’t let it fit too tightly or too loosely. The trouble with harnessing the hand, though, is that it needs to apply its own little bit of oomph to hold its shape on its own, so I don’t recommend having something hold your hand together as a long-term solution. However, it may help you understand what the hold needs to feel like by which to proceed. If you decide to try this, let me know what you did and how you fare once you didn’t need it any more. Your experience will help me to help other players.
For more information about playing the dulcimer safely, click here.
Back to Hammered Dulcimer FAQs
Why is there only one “right” way to play? That doesn’t seem fitting for a folk instrument.
It’s unclear if you are attaching “one ‘right’ way to play” to one finite set of notes in, say, a fiddle tune like “Soldier’s Joy,” so I’ll address that first. Aside from there being numerous variants of fiddle tunes, both in print and passed around by ear, it’s more than allowable (and in other string-instrument circles, expected) to be able to fool with tunes and see what else you can come up with on the spot. The sky is the limit in this arena.
Now, if your question has to do with the reasoning behind an established method of playing the dulcimer: I’ve heard it said often in dulcimer circles that “you can play the dulcimer any way you want.” This statement is true within the creative realm of music like ornamentation, extemporization and improvisation, heading to points above and beyond technical mastery. However, it seems to me that most players interpret this statement to mean “you can hold the hammers/set up the dulcimer/strike the strings/strike out a tune/etc. any way you want.” This interpretation means runs the risk of giving us problems down the road like Repetitive Strain Injury, including Carpal Tunnel Syndrome. These not places that I desire to take myself or anyone I teach.
As a case in point, consider the bodhran (pronounced BORE-ahn), the Irish hand-held drum. The couple of times I’ve asked a bodhran player if I might give it a try, I immediately get a lesson on how to hold the drum and the beater, how my hand/arm needs to move to play, and the kind of sound to strive for. Bodhran players have inevitably (and thankfully) learned too many times that a novice left to his/her own devices is bound to make playing the bodhran more difficult than necessary, and will make it sound less than wonderful as well (not to mention possibly messing up the drum skin) without a bit of instruction.
If an instrument as “simple” as the bodhran can have a defined playing method, why not the dulcimer? (There are also methods around on how to play folk guitar. And how is it that an 11-year-old mandolinist I once heard could wail away with the fastest of bluegrassers? It’s hard to believe he doesn’t have some kind of organization behind his playing.)
I don’t know how the dulcimer manages to be exempt from an established playing method, but I do know that those who embrace a free-form approach are experiencing pain, or worse. There is no need for anyone to play the dulcimer in pain. I’ve done considerable Striking Out and Winning!> research on what it takes to play the dulcimer and autoharp safely, based on anatomy, physiology, Body Mapping and kinesiology, in order to determine what the body needs from the dulcimer and autoharp player in order to play freely, without pain or injury. Also, because it’s a fact that any instrument contributes only 25% to the music with the other 75% coming from the player, a lot of players are missing out on some really fine resonance that would make them love their instruments that much more. Why not have it all?
Ultimately the decision is yours when it comes to your physical approach to the dulcimer or autoharp. The difference in ease of playing, tone and phrasing are astounding, and I continually delight in my students’ success along these lines. You are entitled to that success, too.
Back to Hammered Dulcimer FAQs
Has anyone ever done any research as to how many times each hammer strikes the strings when playing a tune like “Ragtime Annie”?
The answer is: It depends. We first must decide how long “Ragtime Annie” is, as well as how it goes (this is folk music, after all). If it’s AABB’ in the notey version I play, that’s 32 bars’ worth of tune, in which case the minimum number of strikes comes out to 127 in the right hammer (the odd number being due to a syncopated beat towards the end of the B’ section) and 92 in the left. That’s what I get, anyway, using a dominant-hand lead to play this tune. However,…
Should “Ragtime Annie” have a C section (instead of a natural birth ;>), having a form of AABB’CC (adding another 16 bars), the right hand’s activity rises to 161 strikes, and the left hand to 112. But this tune seldom ends on the final C section. Sometimes it goes back to the beginning for another play-through of AABB’ before ending. (I’ll let you do the math on that addition.) However,…
I also throw in some two-stroke rolls, adding roughly two more strikes per hammer per occurrence. With eight such rolls in my AABB’ version, the strike count rises to 157 in the right hand and 122 in the left. For AABB’CC, it’s 207 in the right hand and 158 in the left. Then…
If I fill in the spaces in the tune’s rhythm with extra notes,…. And all that times however many play-throughs occur,….
Um, anything else on this FAQ? Contact me if you can think of something!
Back to Hammered Dulcimer FAQs
Autoharp FAQs
I just recently started playing the autoharp. Can you tell me why I’m hearing a scraping noise when I strum? It sounds like the thumb pick is hitting the dampened strings. I’ve tried adjusting the pressure when I strum and nothing seems to make it better. How do I get rid this scraping sound?
First of all, let me put you at ease: Your autoharp is fine.
My first best guess (and it’s a strong one) is that the scraping sound you hear is coming from the thumb pick moving down the wound bass strings instead of across them. Put your thumb pick on and rub the tip along the autoharp’s lowest strings. You will probably hear the scraping sound here, too. So the thumb pick is rubbing on the wound strings, and you get scrape instead of pitch.
In order to hear string tone, the thumb pick needs to move across the strings. The best way when playing the autoharp upright against the chest is to tilt the autoharp so that its sole, slanted side is vertical with the floor, like this:
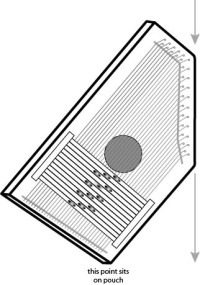
This also slants the strings so that your strumming arm takes the thumb pick across the strings.
If you are holding the autoharp so that its longest side is vertical to the floor, then the strings are set vertically, too. When you use the same, beautiful strum arc to strum dead-vertical strings, the thumb pick contacts only those strings nearest to it, which all happen to be wound bass strings, like this:
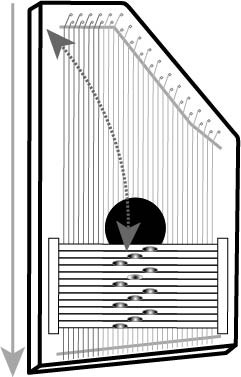
The result is the scraping sound you hear.
So the answer is to tilt the autoharp so your strumming can access all the strings.
Note: Do not set up your autoharp so that the strings are vertical to the floor, as this will make your arm strum horizontally across the strings. It sounds like you are strumming mainly from the elbow with a little rotation coming from up in the shoulder, which is terrific. This is a very simple move that we all need.
Again, this is only a highly educated guess. If this isn’t the answer, then let’s have a lesson together, either in person or via webcam (which works great, by the way) to find out what’s really going on.
What’s the difference between a chromatic autoharp and a diatonic autoharp?
First, let’s look at what chromatic and diatonic autoharps have in common. They both have about the same number of strings (about 36 -37, but less and more are out there, too–ah, the flexibility of folk instruments) and cover roughly the same range parameters (often from low F to high C, although this can vary slightly on diatonic autoharps, depending on the key).
Now for the differences. The chromatic autoharp uses all 12 tones of the chromatic scale (the white and black keys of the piano), and one string is tuned per note name.
A diatonic autoharp, however, uses only the tones of the scale(s) it’s tuned to (there’s no need to include the tones that are out of the key). A single-key diatonic in C major would include only the tones of the C-major scale: C, D, E , F, G, A and B. A two-key diatonic autoharp in F and C major includes F, G, A, Bb, B, C, D, and E in its tuning; Bb goes with F major, and B goes with C major (when playing in F major, a “lock bar” can be engaged to damp out all the B strings which aren’t part of the scale). A three-key diatonic–say GDA–has ten tones: G, G#, A, B, C, C#, D, E, F, F#. Because a diatonic autoharp covers the same range as a chromatic, pairs of its mid- to high-range strings are tuned to the same note name to fill in the gaps. This holds the range to be the same as chromatic, and increases the volume of the diatonic autoharp.
As for the playing differences between these instruments, the best way I can explain it is with a five-note major scale played up and down. Playing this scale on a chromatic autoharp requires the Roman numerals I, IV and V chords of the key, like this:
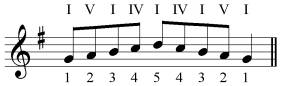
The above scale can also be played this way on a diatonic autoharp, but with the diatonic tuning, there is another way: Because steps 1, 3 and 5 are all tones of the I chord, the player depresses I on those tones, releases the I-chord bar to play steps 2 and 4 (circled below), aims carefully–and prays!–like this:
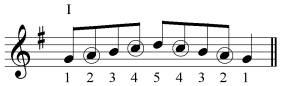
The left-hand finger on the I chord pumps up and down to access all five scale tones.
As to the sound differences: Changing chords constantly in chromatic playing continually damps strings from chord to chord, resulting in a choppy sound. The diatonic autoharp’s use of what I call “chord-and-release” means that any chord’s lowest bass tone can ring long after it is plucked, and that picking fingers can move quite fast when needed.
Obviously, these technicalI ties creates differences in repertoire, too. The chromatic autoharp is capable of playing songs with key migrations more easily than diatonic autoharps because of the number of keys and chords available. The diatonic autoharp enables the player to play jigs and reels at dance tempo, with a resonance that’s harder to come by consistently on a chromatic autoharp. To that end, both instruments have advantages and drawbacks.
You can hear a representative sampling of what four diatonic autoharps in different keys can do on my CDs, Thus Sings My Soul and All in a Garden Green.
I have been playing chromatic autoharp for some time, and am finally going to order my first two-key diatonic autoharp! My luthier wants to know if I want lock bars installed. Some experienced players have told me I don’t need them. Do I, or don’t I?
First, my heartiest (and biased!) congratulations for choosing to go diatonic!
Lock bars: Despite my own diatonic experience, I like them and use them (I’ll tell you why in a moment). For you, just starting out, I recommend getting one lock bar for each key. If you think you might want to swap these bars out for regular chord bars down the road, order a couple extra blank bars that you can cut to chords of your choice when the urge hits you.
What does a lock bar do? In the high octave of a GD diatonic autoharp, for example, there is a single C string and a single C# string next to it. These are surrounded by double-tuned strings in the other scale tones, so: G-G, A-A B-B, >C, C#, D-D, E-E, F#-F#, G-G and so on. When the G lock bar is engaged, all the C# strings are damped. Strum across all the strings slowly and you will hear only the tones of the G-major scale. Disengage the G lock bar and engage D. Now, all the C strings are damped, and you strum across only the tones of a D-major scale.
The doubled-string area is where a lot of melody playing resides. When we chord-and-release (see the previous question) here, those doubled strings forgive the “slop” in our picking(!), except where the single C and C# strings live. When playing an autoharp without lock bars, the picking around C and C# needs to be more precise. Sounding just one of these strings without our picks bumping into the other is difficult, especially for new felt pumpers. You would likely strike both of them, creating a blur of sound, because you will space your fingers to strike pairs of strings in this region.
An autoharp having two lock bars (on GD, each one damps either C or C#, not both) lets both the ringing string and the damped string behave like the other tuned pairs of strings, with only the ringing string sounding. So, when playing in G major, a pick may contact both C and C#, but only C rings because C# is damped by the lock bar. More forgiveness: The doubled-string finger spacing can be retained when a lock bar is engaged. Because I want a clean sound all over the scale I’m playing in, I still use lock bars.
Experienced diatonic autoharpists may be able to exchange lock bars for real chord bars; however, here is a good reason to keep them, anyway, despite ample experience: I like to throw a glissando in some of my pieces. The absence of a lock bar means that the scale over which the pick slides becomes “one-third chromatic”. My ear seems happier with a glissando that is either entirely diatonic or chromatic, rather than in between, so viva la lock bar!
Back to Autoharp FAQs
What’s an ultratonic autoharp?
This is an uncommon, one-key diatonic autoharp, created by the late, great autoharpist, Marty Schuman. Its chords are downright strange, including pentatonic scales and sixth chords for starters. When you hear it, you may not be able to get your ear off of it; its harmonies really swirl.
My monograph, How to Create and Play the Ultratonic Autoharp, offers complete conversion instructions plus a playing section to get you started. The conversion is easy, although it will take a few hours to complete, because the ultratonic autoharp is tuned in one key. After that, once you know which tones are damped in each chord bar, the bars are felted just like they are for any other autoharp. For further inspiration, two of my CDs, Thus Sings My Soul and All in a Garden Green, feature tunes played on a Bb ultratonic autoharp.
Is it better to play the autoharp standing up or sitting down?
What chord-button arrangement would you recommend for a diatonic autoharp?
Whether chromatic or diatonic, I’d recommend the same arrangement, even though the diatonic autoharp has fewer chords.
When I hold the autoharp upright against my chest to play, the minor chords are in the top row (closest to my nose), the major chords are in the middle row, and seventh chords and “weird” chords, like suspended-fourth (sus4) chords and pentatonic scales are in the bottom row. lock bar buttons for diatonic autoharps (used to lodge a chord bar in place to damp tones outside the key being played in) go either in the bottom row or to the right as I look down at the buttons. Within each row, the chord letter names appear in a circle of fifths (see explanation to the right of the diagram coming up).
As an example, shown below is my set-up for the FC diatonic autoharp with two lock bars. You can translate what’s shown to any other key and even to chromatic autoharps:
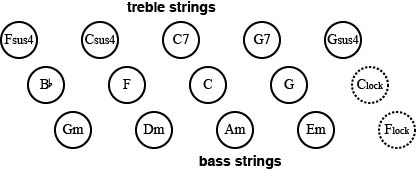
(Copy the button illustration. then paste it to a separate document. After printing, turn the paper so that the blank side is against your chest. Then set the page so that the minor chords are closest to your nose.)
As to what I mean by the chords being set up in a circle of fifths, here’s an example from the major chord (middle) row: If you count Bb as “1,” go through the alphabet up to “5” and that’s F. (Counting on your fingers may help here!) Ditto for F to C, etc.
By the way, all buttons in one key are easily accessed by the fingers without the thumb. Park your middle finger on F, and the index and ring automatically land on Bb and C. Those fingers each move up to access the relative minor chords. Finally, rotate the left hand clockwise and the ring finger winds up on C7.
The beauty of this system is that all keys feel the same when the chords are interpreted via Roman numerals instead of letter names. A couple chords on a 21-chord chromatic autoharp are placed “oddly,” but all the rest fall into this set-up, including seventh chords occupying the row nearest the knees. On a diatonic autoharp, lock bars, “color chords” and other chords may share the “knees” row with the seventh chords.
How do I keep my fingerpicks from falling off?
- First, make sure you have the right size picks for your fingers. I have small hands, and clunked around at first with regular Dunlop picks until someone handed me a set of Dunlop mini picks. If the pick head completely covers the pad of your finger so that you can’t see it, it is too big. Those individuals, shops and web sites caterings to pickers are all good resources for the smaller picks, made by Dunlop and other companies.
- Second, most of the picks I’ve seen come from the factory with the bands shaped conically. If all you do is push these bands in to fit your fingers, that conical shape remains in place, which means that only the top edge (well, maybe a little more than that) is hugging your finger, not the entire band, which is needed for secure contact. So, using needle-nose pliers or that famous autoharp-surgery tool, the hemostat, adjust the bands so that the sides are parallel to each other, then push them in to fit. You can still make the sides parallel if the bands are already pushed in, but you’ll still need to make further fitting adjustments. (Note that I suggest this on the assumption that the joints are not swollen due to arthritis or accidents, posing other obstacles. We still need picks available to accommodate these needs, something thats very hard to do because every physiological situation is different.)
- Don’t let the bands overlap on the back of each finger. The space at the overlap creates a less secure hold, and I always found that the overlap forced the lower band side into my cuticle, causing discomfort. With the mini pick bands still being too long for my fingers, I shorten them with a small triangular file, grinding down the ends of both bands at once using two sides of the file. You may have to push the ends of the bands on a new pick a little closer together before filing, or pull them apart if you’ve already worn the picks. Because the triangular file sports three different grind grades, I periodically reverse the file to flip the grinds to opposite sides to even things out some.
- Finally, a fit tip: Youll feel the weight of the picks less by pushing them onto your fingers so that no more than 1/8 inch extends beyond the fingertip when viewed from the back of the hand. If you’re looking for agility when you play, this will help loads.
Miscellaneous
How can I determine what level of player I am? ( Such as what degree of beginner, intermediate or advanced?)
I don’t know your playing facility or what you know about your instrument or of music in general well enough to be able to say. But you do. Here are some tools to help you figure it out for yourself. Remember that what follows is strictly my take on playing levels. Other teachers will certainly have other opinions. Levels have not been standardized, although I do think that all teachers would agree that something is needed so that class members in a five-day workshop, for example, will be reasonably close in ability. And those who play instruments other than dulcimer and autoharp will need to develop other criteria than those mentioned here.)
First, let me add two more levels to the three in your question: novice and advanced beginner. As the swimming lessons I took as a child suggest, there is too big a gap between beginner and intermediate. As folk-music dealer said to me years ago about dulcimer players, “They play three tunes and all of a sudden they call themselves intermediate.” Look again. As I ponder my early days of dulcimer playing, I realize that what I knew from being able to play 20 tunes couldn’t possibly be considered intermediate. But one thing’s for sure: one’s level has little to do with how many tunes one knows how to play.
One level I haven’t added is “professional.” That seems to do more with making money, and from that standpoint bears no relationship to knowledge or technical facility.
Of these levels then, I’d say (and remember, this is strictly my take on the subject) that each one holds a certain degree of understanding:
- novice: never heard of the concept, or the player has heard of it but doesn’t know anything about it.
- beginner: simply does what’s fed by other players and/or what’s in written music (essentially this person plays by referring to “recipes”).
- advanced beginner: begins to explore away from recipes but still needs guidance.
- intermediate: understands the difference between why or why not to do something.
- advanced: is ahead of the pack, blazing trails for the rest to follow.
To rate your level of playing, consider your level of understanding for each subject area below. Go through the General list and then the list pertaining to your instrument. (If you play both instruments, rate the items in the General list for each instrument; you’ll probably find that some items will be rated differently according to the instrument.) Rate each item on a scale of 1 to 5 (1=novice, 5=advanced).
General
- music reading
- music theory
- ergonomics of playing
- terminology (a dotted rhythm, for example, differs greatly from syncopation!)
- playing tunes by ear
- chording by ear
- harmonizing by ear (unlike chording, this involves adding a single-voice harmony part)
- balancing melody and “filler” so that the former stands out
- use of dynamics
- choosing alternate chords
- the style of playing each tune required to communicate its message (this varies from tune to tune)
- variations/extemporization
- musicality (just playing the notes/chords vs. music that really talks to your listeners)
- arranging tunes so that they “tell stories” in logical progression and maintain listener interest
Hammered Dulcimer
- use of sustain as an integral part of arrangement
- an order of strokes that’s organized and related to the rhythm
- flexibility in the tuning scheme as it applies to tunes (i.e., there are six different ways to play a one-octave G-major scale)
- ability to play tunes by pattern while looking at the strings, rather than reading written music
- which hammers play best for each piece
- double stops, rolls, rolled chords and the like
- hand independence (playing two parts at the same time)
Autoharp
- finding a solid chord progression that sounds both the tune and its back-up chords
- technical organization in the playing hand (using three fingers and thumb)
- finger dexterity
- thumbing (constant vs. selective)
- unusual sounds (using suspended-fourth chords, pentatonic scales, etc.)
- resonance/damping (choosing to let strings ring long, or to damp them)
There are probably more items that can be added to the above lists, but what’s here is good for starters.
To determine your level of understanding of each item on the list, let’s consider “choosing alternate chords” as an example. I don’t know what you know about them, but consider what follows to apply your own level to this area:
- If you don’t know what alternate chords are, or have heard about them but don’t use them, consider yourself a novice.
- If you know what alternate chords are but play them only when someone writes them out or shows you where/how to play them, you’re a beginner.
- If you’re inserting alternate chords in some of the tunes you play, but aren’t sure if they make sense and need to ask someone for help, you’re advanced beginner.
- If you know in your heart that the alternate chords you’ve inserted are solid, you’re intermediate.
- If you know where to play alternate chords in an arrangement and go beyond into turning some of them into unusual sounds (like suspended-fourth chords and pentatonic scales), you’re advanced.
Got that?! Go through this same process for each subject area (honesty is essential!), and then add up all the numbers you came up with and divide by 5 to yield one level that more or less defines your playing overall.
I read music well. Do I need to take a beginner class?
I recommend being in a beginner class. Reading music tells us nothing about what it takes to make a good sound on an instrument (the instrument can’t do this by itself), play it easily, how to wend one’s way about it seamlessly, etc.
Why is it that I always seem to be playing the “wrong version” of a tune in a jam session? Are there “right versions” that everyone knows? If so, where can I find them?
First, remember that jam sessions are usually about folk tunes. There’s no one “right” way that a tune is played, unless we know who composed it, and the composer wrote it down and/or recorded it. Look in several tune books and you’ll quickly see that the same tune in each book agrees in title (although some tunes may have more than one title!), but with small variations note-wise.
Tunes also vary according to particular groups of people, like a dulcimer club vs. a fiddle club. Plus, they can vary regionally. For example, “Soldier’s Joy” is played in the northeastern US in the form I would call AABB, but in Kentucky, it’s played BBAA (which is AABB to them!–see page 126 in Striking Out and Winning! for the northeast AABB version). Each form is right, depending on where it’s played. As another example, I once played “Rickett’s Hornpipe” with West Virginia fiddler J.P. Fraley, whose first phrase was different from anyone else’s I’ve heard. But that’s how he knows it, and it may well be the way it’s known all over his area in West Virginia.
A more current (and to me, frustrating) phenomenon within the dulcimer and autoharp communities is that of what I’ll call “tune diminution,” by playing very note-y tunes with a lot less notes. Maybe this happens so that less agile players can keep up, or maybe it’s because players don’t hear all the notes as the tune flies by. Whatever the reason, these watered-down versions soon become “the tune.” (You’ll have a rough time convincing a thorough-going fiddler of that, though.) While fiddle-tune books don’t always agree on the version, they’re usually all close enough in notes that any one of them should win you some admiration by the fiddlers and others in a jam session. When playing a book version in a jam session, the differences in what’s being played are usually slight enough that, if you listen carefully, you can change them on the spot to produce a close enough, if not exact, match. I would encourage you to seek out these notey versions, either in some of the older tune books or send me a recording of your own version and I’ll transcribe it for you. (Note: Transcribing feels a lot better when the tunes are in the public domain or composed by the person who sends them.) Finally, I’m finding that Internet tune sites are not always as reliable as printed fiddle tune sources, and some of the more recent dulcimer and autoharp tune books show fewer notes than what the fiddlers play. So bear these thoughts in mind as you search around, and stay in touch with fiddlers and other players of fiddle tunes who are savvy enough to know the difference.
Finally, it’s a good idea when you’re first learning a tune to play in its expected rhythm with all the expected repeats. Playing all the “correct” notes shorter or longer than intended, as well as without repeats create the potential to wreak havoc at a jam session. (If you find that what you’re playing is clashing with the rest of the group, stop and listen for a while.)
Listening, then, is key. You’ll catch melodic variants peculiar to the region you’re jamming in, and hopefully you’ll be able to pick up the local difference.
Dulcimer players will appreciate that all 50 tunes in Striking Out and Winning! are drawn from fiddle-tune sources, as well as my own practical experience playing all 50 in contra dances with musicians who play them that way, too. Every tune is chock full of notes, but hey, they’re really great to play when you loosen up and have fun!
See also this page listing some of my favorite tune books. You’ll still have to find out which tunes are commonly played (not all are), but they are certainly good resources worth having.
I think I have developed repetitive strain injury (RSI) from playing the hammered dulcimer. What do I do now?
When will you be performing or teaching in my area?
If I’m not already coming to your area, create an excuse! I am always pleased to inspire the masses with music and coach budding players of both dulcimer and autoharp wherever I go. Just contact me with your address, phone number, and e-dress to get started. Also, your recommendation to events organizers always speaks louder than I ever could. To that end, feel free to refer any festival/concert-series contacts to this web site, especially the Concerts and Workshops pages.
I am available to teach workshops and classes at any time of year. It’s important that I perform as well, so that the attendees understand that what I teach is what I do.
Can’t wait for your local educational institution to put me on board for a 3-5-day class? Consider “rolling your own” class. You find the attendees, I structure each class with a schedule, lesson plans and handouts so we get a lot accomplished and have fun, too. Plus, we all chip in on cooking great meals. (Well, at least I think that’s fun; I make a mean pizza!) Be sure to plan far out enough date-wise idea to ensure the dates of your choice.
Copyright ©2004, 2005, 2006, 2007, 2014 Lucille Reilly. All rights reserved.
Last revised: June 5, 2014.